Getting started with Hugo: Hosting and Publishing
Hosting
After a brief review of the selected Hugo settings, let’s review the decisions about hosting. I used only two criteria when I was choosing hosting for my blog website:
- Convenience – the service should be simple to use, allow automation, to have both CLI and Web interface and, ideally, familiar
- Costs – it should be cheap or, ideally, it should be free
The choice for the website source code management was straightforward. Github answers both criteria. It is simple. Supports automations via workflows and actions. And I work with it everyday. Needless to say that it is free (for now).
Selecting the hosting was a more complex decision. There are several free hosting solutions available that provide an adequate level of service. For example, Netlify is often used to host Hugo websites. I decided to try out hosting on Firebase. Here are my pros and cons for this choice:
- pro: Has the free tier that should cover the expected consumptions including
- low rate of updates
- static website which has a reduced read requests and does not utilize storage or other Firebase services
- pro: Firebase runs on reliable Google Cloud infrastructure
- pro: An opportunity to experiment with Firebase product that I didn’t have before
- pro: Easy integration with Github to automate deployment pipeline (see below)
- pro: Easy support for custom domains
- con: Need to migrate to different hosting solution if I decide to add interactive features such as comments or otherwise cross free tier treshold
- con: Does not support BYO SSL certificates and generation of the dedicated certificate requires to be on the paid plan and request to Firebase support
The cons were minor and pros addressed all my criteria. If I get to a point where my blog will need support comments, I will return to review the hosting solution again.
Setting up Firebase is straightforward. You go to the Firebase Console and follow instructions. Actually, I have my website hosting active and my blog published even before I acquired a custom domain. Once you have your domain, add it to the list of domains by following instructions. Firebase takes time to generate an SSL certificate that includes your domain name in the Common Name.
Deployment pipeline
Next step is to build a pipeline to deploy publications to Firebase hosting. In my configuration the process looks like this
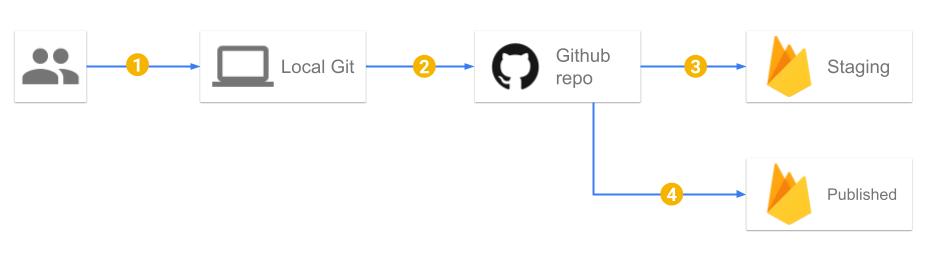
I work on the local branch of Git to and write a post (1).
I commit changes and eventually I push the result of my work to Github as a new PR (2).
So far this a familiar (to Github users) workflow.
I configured two workflows in my .github/workflows folder to automate the remaining two actions.
Create a new PR or pushing changes to it, triggers the staging workflow (3).
This workflow builds the website and publishes it as a preview (aka staging).
Read about Firebase preview channels if you want to learn more.
When the PR is finally pushed to main, another workflow publishes the pushed version of the blog to the live channel.
These workflows are very similar. They utilize existing actions:
Mind that the versions might be more recent when you read this post. If you aren’t familiar with what Github workflows or actions are, Github offical docs can be a good starting point. I used the keyless authentication method to get Google service account key. And I highly recommend this approach to you. However, if all that you have is the JSON with Google service account key, you can store this key as Github secret and skip the “auth” step.
Build Hugo website
The peaceiris/actions-hugo@v2 action basically runs hugo in your repos’ “home” directory.
So, after I used actions/checkout@v4 to get copy my repo’s content to the workspace, this is all what is needed to build the website.
I went with using the fixed version of the Hugo to ensure that my local environment and CI/CD pipeline are synchronized. I used the job execution strategy called matrix with a single variable (hugo).
Then I configured actions-hugo like this:
    - uses: peaceiris/actions-hugo@v2
      with:
        hugo-version: ${{ matrix.hugo }}
This configuration simply downloads the version of Hugo that is configured in the hugo matrix variable.
The simple run action runs Hugo as I would do it in the local environment:
    - run: |
        I18N_OPT="--printI18nWarnings"
        LOG_OPT="--logLevel info"
        hugo $I18N_OPT $LOG_OPT
A small caveat if you show or used ‘Last modified’
If you decided to show “Last modified” date in each post or want to order your post (e.g. in side menu) according to the last modified date, the above building step will not work with Github actions.
I described my configuration for Last Modified.
The configuration makes Hugo check for the value in the post’s metadata and, if it is absent, to use Git to determine the last time this post was modified.
The standard actions/checkout step looks like this:
    - name: Checkout source code
      uses: actions/checkout@v4
This configuration fetches history for the last commit only (same as git clone --depth=1).
I had to reconfigure this step so it retrieves the whole history to enable Hugo to find the last modified date for each post.
It is done by adding fetch-depth parameter with value 0 indicating to fetch all history for all branches and tags.
    - name: Checkout source code
      uses: actions/checkout@v4
      with:
        fetch-depth: 0
Keyless authentication
A very good Google Blog post explains in details how to use the keyless auth technique. All you need to have is a fully qualified resource name of your Workload Identity provider and the email of the Google service account that is granted required permissions.
The advantage of this approach is that (1) you do not need neither permissions to create service account keys nor (2) care about potential problems when these keys are rotated or, possibly, disabled.
Deploying to Firebase
Hugo creates the entire static site in the public directory in the root of the project.
It means that there is no need in the firebase.json config file to deploy the public directory to Firebase.
However, I decided to still define it in order to explicitly set the source directory and
to control whether or not URLs should include the .html extension.
Besides minor cache settings my firebase.json looks like this:
{
  "hosting": {
    "public": "public",
    "cleanUrls": true
  }
}
Following instructions for the Firebase action I set up the deployment to staging as the following:
    - uses: FirebaseExtended/action-hosting-deploy@v1
      with:
        repoToken: "${{ secrets.GITHUB_TOKEN }}"
        firebaseServiceAccount: "${{ steps.auth.outputs.credentials_file_path }}"
        expires: "7d"
        projectId: ${{ secrets.FIREBASE_PROJECT_ID }}
Mind that in order to deploy to live channel instead of staging you have to replace expires parameter with channelId: live parameter.
IMPORTANT Current version of the Firebase action is
v0. It does not support passing the path to credentials. To use versionv0you will have to add a step where you read credentials data from a file into environment variable first.